1. Subversion(SVN)概念與工具介紹
http://www.cc.ntu.edu.tw/chinese/epaper/0020/20120320_2002.html
2. SVN 入門安裝設定教學
http://ithelp.ithome.com.tw/question/10078555?tag=rt.rq
3. Subversion 目錄存取權限控管
http://huan-lin.blogspot.com/2010/01/subversion-folder-access-control.html
2013年12月19日 星期四
為甚麼Java提供Interface
Source: http://programming.im.ncnu.edu.tw/J_Chapter7.htm
許多語言提供Class的多重繼承,但Java考量諸如下面的多重繼承問題,選擇不引進Class多重繼承:
假設B繼承A,C繼承A,D又多重繼承B,C, 該語言又使用virtual function則
如果Class裡有一個以上的abstract method,則該class必須宣告為abstract。有時候即使沒有abstract method,也可以宣告該class為abstract。我們不可以直接new該class的物件,只能new其子類別物件。
為甚麼Java提供Interface
雖然程式語言提供了基本資料型別,但由於各種應用都有其特定的資料結構需求,因此程式語言都提供使用者自訂型別的能力。型別自訂後,其使用的方法和基本資料型態類似。Class就是一種使用者自定的型別。Java提供了instanceof的保留字,用以判斷某reference所指到的物件,其型態和某Class是否相容:Object ref; ref = new Bird(); if (ref instanceof Animal) { // correct System.out.println("ref is currently pointing to an Animal Object."); }在物件導向的觀念裡,物件可以具有多個型別。例如「附有橡皮擦的鉛筆」,可以當成是「書寫工具」,也可以當成是「擦拭工具」。物件可有多種型別的觀念,不僅在日常生活中常見,在軟體開發上也有實際的需求。要使物件具有多種型別,可透過繼承來達成。例如Bird物件就同時具有Bird和Animal兩種型別。由於Java的Class只能有單一繼承,因此像「附有橡皮擦的鉛筆」同時具有「書寫工具」和「擦拭工具」兩種互不相關的型別,就無法透過Class的單一繼承來達成了。
許多語言提供Class的多重繼承,但Java考量諸如下面的多重繼承問題,選擇不引進Class多重繼承:
假設B繼承A,C繼承A,D又多重繼承B,C, 該語言又使用virtual function則
- 如果B, C都有overwrite A的methodM方法, 而A ref指到D類別的物件, 請問透過ref傳遞methodM訊息時, 應該使用B還是C的methodM?
Java有關Interface的語法
- 宣告Interface
public interface Listener {
    double PI = 3.14149; // 同public static final
    void listen(); // 同public abstract
}
public interface Runnalbe {
    int PERIOD = 10;
    void run();
}
public interface AnotherRun {
    int PERIOD = 20;
    void run();
    int run(int);
}
注意上述函數宣告沒有{},也就是說沒有實作的意思。 - Interface的繼承
public interface ActionListener extends Listener {
}
public interface MultiInterface extends Listener, Runnalbe {
}
- Class實作Interface的宣告
public class A implements Listener {
    public void listen() {
    }
}
public class B implements Listener, Runnable {
    public void listen() {
    }
    public void run() {
    }
}
public class C implements MultiInterface {
    public void listen() {
    }
    public void run() {
    }
}
public class D extends A implements Runnable, AnotherRun {
    public void run() {
    }
    public int run(int period) {
    }
}
D ref = new D();
ref instanceof D; // true
ref instanceof Runnable; // true
ref instanceof AnotherRun; // true
ref instanceof A; // true
ref instanceof Listener; // true
Interface中宣告的變數具有以下特質
- public。所謂Interface(界面)指的是外界觀看某物件時,所能看到的表象以及溝通的管道,因此Interface內的成員一定是public。也就是說即便宣告時沒寫public關鍵字,Compiler也會幫我們加上去。
- static。既然Interface沒有實作,就不可能透過Interface產生物件。換言之,Interface內的變數一定是屬於Class,而不屬於Object。
- final。Interface可視為一種約定或契約,我們自然不希望裡面的variable可以隨便更改。
- public。同變數說明。
- abstract。Interface沒有實作,裡面定義的method只是宣告而已。沒有實作的method,在Java裡用abstract這個關鍵字來表達。有關abstract的詳細說明,請見下一節
- 相同變數名稱:由於interface內的變數具有static的性質,因此使用這些變數時,必須加上Interface的名稱才行,如Runnable.PERIOD,AnotherRun.PERIOD,因此不會造成任何混淆。
- 相同函數名稱:如果signature(參數個數,型態以及傳回值型態)完全相同,則Class只要實作一次即可,例如Runnable和AnotherRun均定義void run(),因此Class D只要實作一次就好了。如果同名函數符合Overloading,把它們分別當成不同的method即可。如果參數完全相同,但傳回值不同,則違反了Overloading的原則,會產生Compile Error。
Abstract Class and Method
只有參數宣告,沒有實作的方法,稱為abstract method。某些情況下,雖然有實作,但我們希望強迫子類別必須override該方法時,也可以宣告為abstract method。Interface裡的方法一定沒有實作,因此必然為abstract method。如果Class裡有一個以上的abstract method,則該class必須宣告為abstract。有時候即使沒有abstract method,也可以宣告該class為abstract。我們不可以直接new該class的物件,只能new其子類別物件。
public abstract class AbstractExample {
    int x;
    public void abstract abstractMethod() {
    }
    public AbstractExample() {
        x = 5;
    }
}
public class SubClass extends AbstractExample {
    public void abstractMethod() { // must override this method, or SubClass be declared as abstract class
        x = 10;
    }
}
public class Main {
    public static void main(String[] argv) {
        AbstractExample a = new SubClass(); // correct
        a.abstractMethod(); // virtual function, call SubClass's abstractMethod
        a = new AbstractExample(); // Compile error, you can't new abstract class
    }
}
綜合以上所述,可列出以下幾點特徵
- 具有abstract method的class必須宣告為abstract class。
- 繼承abstract class的子類別必須override所有父類別的abstract method,否則子類別也必須宣告為abstract class。
- 實作Interface A的Class必須實作A裡的所有method,否則必須宣告自己為abstract class。
- 不能直接new abstract class,只能new其非abstract class的子類別。
2013年10月30日 星期三
如何自动cradle wince模拟器
http://m.blog.csdn.net/blog/chief1985/5429861#
wince的模拟器有个Device Emulator Manager,这里面可以对模拟器进行cradle,之后Device Emulator Manager会是activesync和模拟器建立连接(DMA方式),之后wince的一些工具就可以用了。例如cecopy.exe,cedir.exe等,下面是一个列表:
cecopy.exe:拷贝文件到wince设备或模拟器(反过来也可以)
cedel.exe:删除wince设备或模拟器上的文件
cedir.exe:列举文件
ceexec.exe:执行程序
cegetinfo.exe:获取剩余空间信息
cemkdir.exe:创建目录
cereg.exe:注册表操作
cedel.exe:删除wince设备或模拟器上的文件
cedir.exe:列举文件
ceexec.exe:执行程序
cegetinfo.exe:获取剩余空间信息
cemkdir.exe:创建目录
cereg.exe:注册表操作
这些工具的意义看名字就知道了,可以在http://www.microsoft.com/downloads/details.aspx?familyid=74473FD6-1DCC-47AA-AB28-6A2B006EDFE9&displaylang=en下载,这里面还有一些别的工具。
cradle一般的做法是Device Emulator Manager右键来选择。对于喜欢命令行一键搞定的程序员来说,cradle是一个比较麻烦的事,有没有可以在命令行里面cradle的方法呢?
答案是肯定的。在msdn里面,微软提供了一个对Device Emulator Manager编程的方法(http://msdn.microsoft.com/en-us/library/bb887543.aspx)。大家可以从http://download.microsoft.com/download/3/6/1/361517d0-2054-4d41-af95-36d18e141df5/DEMAutomationSetup.msi下载这个例子,然后进行编译,编译一般会报错,说找不到DEMComInterface.tlb,这就需要更改一些工程的Include目录。例子的作者将Device Emulator装在d盘,我们只需要将这个目录改为自己的Device Emulator安装地方就可以了。DEMAutomation支持如下命令,其中就有cradle 。Device Emulator Manager提供的API可以参考http://msdn.microsoft.com/en-us/library/bb531169.aspx。
List :列举模拟器
bringtofront [VMID|Name] :窗口置顶
connect [VMID|Name] :连接
cradle [VMID|Name]
clearsavestate [VMID|Name]
getconfiguration [VMID|Name] [existing device configuration file]
reset [VMID|Name]
uncradle [VMID|Name]
setconfiguration [VMID|Name] [device configuration file to create]
shutdown [VMID|Name]
|
参考网址:
http://msdn.microsoft.com/en-us/library/bb887543.aspx
http://msdn.microsoft.com/en-us/library/bb531169.aspx
http://social.msdn.microsoft.com/Forums/en-US/microsoftdeviceemu/thread/84fb02dc-2510-46b4-98e9-541297d555c4
http://msdn.microsoft.com/en-us/library/bb531169.aspx
http://social.msdn.microsoft.com/Forums/en-US/microsoftdeviceemu/thread/84fb02dc-2510-46b4-98e9-541297d555c4
2013年10月28日 星期一
Windows Mobile App Development
Windows Mobile App Development
- Windows Mobile App Development Part 1: Creating your first application
- Windows Mobile App Development Part 2: Device Emulator and Device Emulator ManagerUse Device Emulator and Cellular Emulator to test your applications.
- Windows Mobile App Development Part 3: Basic WinForms App Development for Windows MobileDevicesLearn the basics of developing Windows Forms based applications for Windows Mobile devices.
- Windows Mobile App Development Part 4: Adding Custom Controls and Making Use of GPS HardwareLearn to add custom controls and make use of GPS hardware in your applications.
- Windows Mobile App Development Part 5: Intro to using SQL Server CELearn to access data through
DataSets andSQLCeResultSets in your Mobile apps. - Windows Mobile App Development Part 6: Device Security and Application DeploymentGain an understanding of device security, testing, and installation of your application on a Windows Mobiledevice.
- Windows Mobile App Development Part 7: Mobile Web DevelopmentLearn to create web based apps for Mobile devices with AJAX support enabled using browser controls.
Additional resources and references
- Windows Mobile Developer Center
- Introduction to development with Microsoft Windows Mobile 6
- Development Tools and Resources for Windows Mobile 6
- Code Samples for Windows Mobile
- How do I Build a .NET Compact Framework 3.5 Application for Windows Mobile 6 Devices
- Introduction to Windows Mobile Device Development
- What’s new for Developers in Windows Mobile 6
WMTF - UIAL Overview
The UI Abstraction Layer (UIAL) is a collection of C# classes that model
globalized access to an applications user interface. The Device Automation
Toolkit (DATK) provides C# classes for generic controls, whereas the UIAL
exposes every individual instance of these controls for easy programmatic
access. The UIAL hides details about each control, such as control ID or parent
window, from the tests that need to use these controls. In this way test cases
are isolated from changes in the UI - changes to details in UI controls only
require changes in the corresponding UIAL, not in the hundreds of test cases
that may require access to that control.
UIAL Components
Every application has its own set of UIAL projects - one for each supported device. Within each UIAL project you will have 4 important components:Dialog Classes
Every dialog in an application is exposed in a Dialog class.- Derives from MobilityToolKit.MobilityDialog
- Contains details about the dialog itself such as control ID and parent window.
- Exposes a DATK object for every control contained within the dialog. The DATK objects are exposed as properties of the dialog class.
- Contains a VerifyAllControls() method that checks to see that each non-optional control in the dialog can be found.
- Exposes a static instance of the IdnHolder class for the dialog to provide access to localized strings found in the dialog.
- Recently updated versions expose a DATK ControlBinding object for every control which gives you access to the WindowFinder used to bind to a control.
- Example: %_WMTFROOT%\CalViewSample\AbstractionLayer\SmartPhone\CalViewMain.cs
Application Class
Each application has one application class to hold all the dialog classes. This is the starting point for locating any single UI element.- Contains a Launch() method used to start the application using the UI.
- Contains a static property for each of the Dialog classes within the app.
- Example: %_WMTFROOT%\CalViewSample\AbstractionLayer\SmartPhone\Microsoft.MobileDevices.AbstractionLayer.CalView.SmartPhone.cs
IdnHolder Classes
Each dialog in an application has an associated IdnHolder class to hold localized resources for the dialog.- Contains static IdnString instances for various string resources found in the dialog.
- Example: CalViewSample\AbstractionLayer\SmartPhone\IdnHolders.cs
UIAL self-test
Each UIAL contains a self-test suite that walks through the UI to validate itself.- Contains Begin() and End() methods for test setup and cleanup.
- Contains AbstractionLayerBVT() method which walks through the UI to call VerifyAllControls() on every dialog in the application.
- Verification is very simple - the test passes if AbstractionLayerBVT() completes without throwing an exception.
- Example: %_WMTFROOT%\CalViewSample\AbstractionLayer\SmartPhone\Microsoft.MobileDevices.AbstractionLayer.CalView.SmartPhone.cs
The UIAL for an application is used primarily by the Area Library for the
application. Briefly, the Area Library is a collection methods that accomplish
common UI tasks. For instance, the Inbox Area Library might contain a method
that configures a messaging account, while the Contacts Area Library might
contain a method to create a new contact. In order to accomplish these tasks the
Area Library has to interact with a large number of controls on the device.
Rather than specify the details of each control itself the Area Library simply
gets the DATK object for UI element that it is interested in from the UIAL and
then interacts with that object. For example, in order to select an item in the
sample CalView application, you would
use:
To a large extent the UIAL consists of generated code, but area owner expertise is needed to finish the process. The following are the general steps that are used to generate a UIAL. The work items below are needed to complete the UIAL. Remember, when working with the UIAL, that most of the classes representing dialogs will be automatically regenerated, so making changes to these files is wasted work. For this reason when changes are needed in these dialog classes you need to either add tags to the associated RCML files, or you need to extend the class that needs changes and make the changes in the inherited class. This is not the case with the classes representing applications.
Every UIAL project has an auto generated self-test to smoke test the UIAL. A self-test is a convenient way of ensuring a minimal level of correct functionality of the UIAL. To implement this, you need to modify the test to open every dialog before calling the validation method on that dialog. This will take a couple hours at least.
When UI or resource changes are made in the product the UIAL must be updated to reflect these changes.
CalViewUIAL.CalViewMainDialog.MainListView.SetItemSelected(index,
true);
The Area Library uses the UIAL to locate specific controls by narrowing down
the location from the app, to the dialog, to the control itself. The Area
Library only cares where the control is, not what properties it has, which
provides a level of isolation from changes in the UI.To a large extent the UIAL consists of generated code, but area owner expertise is needed to finish the process. The following are the general steps that are used to generate a UIAL. The work items below are needed to complete the UIAL. Remember, when working with the UIAL, that most of the classes representing dialogs will be automatically regenerated, so making changes to these files is wasted work. For this reason when changes are needed in these dialog classes you need to either add tags to the associated RCML files, or you need to extend the class that needs changes and make the changes in the inherited class. This is not the case with the classes representing applications.
Generate RCML files for dialogs and windows.
Use RcmlSnap to take a snapshot for every window in your application. This could take a few minutes per dialog.Rename Controls in RCML to be Semantically Correct.
See the section on Editing the RCML to find out how to do this. This could take about 15 - 30 minutes per file.Generate your UIAL project.
- Run RCtoCS to generate the cs files for your application windows, and include them in your project.
- Run UIALAppGen to generate the code for the application and main dialog classes.
Expose IdnStrings.
- IdnStrings are a way to globalize strings found in the product, so that test automation can be easily globalized.
- Use CeStrip to extract the resource strings and IDs from each module in your application.
- RCTOCS will produce a skeleton file to hold your IDN strings called IdnHolders.cs along with the other classes for the UIAL. In this file you will find a class for each of the dialogs in your UIAL. Assuming that globalization of your test automation is important, the task here is to populate these classes with IdnString objects for strings that are exposed from your dialogs.
- Each class contains an example that will help you see how to create the IdnString object. Depending on the size of your area and the number of strings this could take a couple hours.
UIAL Self-Test.
Every UIAL project has an auto generated self-test to smoke test the UIAL. A self-test is a convenient way of ensuring a minimal level of correct functionality of the UIAL. To implement this, you need to modify the test to open every dialog before calling the validation method on that dialog. This will take a couple hours at least.
When UI or resource changes are made in the product the UIAL must be updated to reflect these changes.
Re-run RcmlSnap to update the RCML files
- Run RcmlSnap on a new or updated window. With updated windows, make sure that RcmlSnap has access to the existing .rcml file, so that it can round-trip changes you've made to it previously.
Re-run RCTOCS to update the UIAL files
- See RCtoCS for information on running the tool.
Re-run CeStrip to get an updated list of resource strings.
- See CeStrip for information on running the tool.
- Look at the IdnHolders.cs file for your UIAL project, a new class will be added for every new RCML file.
- Add any new resource strings to the corresponding dialog classes in IdnHolders.cs.
Make sure the UIAL self-test passes
- Build and the UIAL using Visual Studio.
- Run the UIAL self-test by deploying the UIAL project with the Tux.Net project as the startup project.
These are the tools used when working with a UIAL:
- RCtoCS: Tool generates UIAL Dialog classes based on RCML files that have been decorated with specific tags.
- RcmlSnap: Tool generates RCML based on the top-level window currently displayed on a device.
- GenFinder: Tool determines Datk.WindowFinder object that should be used to locate a specific control on a device.
- CeStrip: Tool which extracts resource strings in name=value pairs from a Windows CE binary.
- UIALAppGen: Tool generates a UIAL Application class based on a number of UIAL Dialog class files.
In order to auto-generate abstraction layer code for your application, you
must first mark up the .RCML files that correspond to each dialog in the
application.
RCML is XML, and the tool that reads it and converts it to C# code is looking for a specific set of attributes that need to be added to the existing tags. What follows is a list of the tags you want to change, the attributes you want to add to each tag, and an example of each attribute. Attributes are case-sensitive.
RCML is XML, and the tool that reads it and converts it to C# code is looking for a specific set of attributes that need to be added to the existing tags. What follows is a list of the tags you want to change, the attributes you want to add to each tag, and an example of each attribute. Attributes are case-sensitive.
- <PAGE>
- APPNAME="appName": This is the name of your app to be appended to your project namespace when the C# code is generated.
- FRIENDLYNAME="FindReplace": This will be the name of the parent class containing all the child controls. Don't add "Dialog" as part of the text, since that will be appended to your FRIENDLYNAME by the codegen tools.
- NAMESPACE="Microsoft.MobileDevices.AbstractionLayer.pOffice": This is the parent namespace onto which APPNAME will be appended. Do not put the value inside the APPNAME attribute into your NAMESPACE value. If you have a parent app namespace, like pOffice or pOutlook, this is the right place to add it.
- PROJECT="PocketPC": Choices are PocketPC and Smartphone.
- DIRECTORY="\abstractionlayer\<appName>\<sub-appName>\<project>": This is a relative path where the generated files will be copied.
- CSHELP="The FindReplace dialog": This is a place to put text that will be added to comments in the generated code.
- PROCESSNAME="yourapp.exe" - (OPTIONAL): This attribute will add a property to the dialog window finder that tells it to match this dialog only if it is owned by the provided process name. This can be helpful if the wrong dialog is being found when you try to initialize a specific UIAL object.
- SCOPE="private" - (OPTIONAL): This attribute will cause a base and a derived UIAL class to be generated by rctocs. The derived class can safely be hand-edited. Include this attribute if you need to override any of the UIAL defaults. If you don't need to do this, leave this attribute off.
- BASECLASS="ClassName:(parameterString)" - (OPTIONAL): This attribute specifies that the UIAL class generated for this dialog should be derived from base class "ClassName" and that the constructor should pass "paramaterString" to the base constructor. The base class needs to derive from MobilityToolKit.MobilityDialog.
- OBSCURED="true" - (OPTIONAL): This attribute will force the .Visible property of the mainFinder object to be set to false. This worked around a bug in the DATK that caused exceptions when a UIAL object is initialized with the .Visible property set to true. This should no longer be necessary.
- IGNORETEXT="true" - (OPTIONAL): This attribute will prevent rctocs from initializing the .Text property of the mainFinder object. This is useful under circumstances where the main dialog's titlebar text changes at runtime, or the auto-generated IDN value corresponding to the window title is wrong, for whatever reason. NOTE: including this attribute will cause any value inside the IDNTEXT attribute to not be generated.
- IDNTEXT="YourDialogIdns.mainWindowTitle" -
(OPTIONAL): If present, the contents of this attribute will be used as the value
of the .Text property of the mainFinder object, in place of an auto-generated
IDN value. We recommend that the value you use here is a reference to a member
variable contained within the IdnHolder class that belongs to this dialog. An
instance of this class is already provided by rctocs, for your convenience, and
looks something like this:
/// <summary>
/// IdnHolder object holding all the owner-maintained strings for AlignDialog./// </summary>
public readonly AlignDialogIdnHolder AlignDialogIdns = new AlignDialogIdnHolder();
- <BUTTON>, <CHECKBOX>,
<COMBOBOX>, <LABEL>,
<LISTBOX>, <SPINNER>,
<EDIT> (the following attributes apply to all of these
tags)
- FRIENDLYNAME="ShowFormattingCheckBox": This will be the name of the control in the generated code. You should append the control type to 1 or 2 words describing the control.
- CSHELP="Check this box to toggle formatting display": This is a place to put text that will be added to comments in the generated code.
- OBSCURED="true" - (OPTIONAL): This attribute will force the .Visible property of the control's WindowFinder object to be set to false. This worked around a bug in the DATK that caused exceptions when a UIAL object is initialized with the .Visible property set to true. This should no longer be necessary.
- OPTIONAL="true" - (OPTIONAL): This attribute will prevent the control from being added to the dialog's VerifyAllControls() method. This is useful for controls that are present and visible only under specific circumstances at run-time.
- MODIFIER="override" - (OPTIONAL): Use this to specify a modifier for the control (override, virtual, public, private, etc.) where public is the default if not specified.
- IDNTEXT="YourDialogIdns.mainWindowTitle" -
(OPTIONAL): If present, the contents of this attribute will be used as the value
of the .Text property of the control's WindowFinder object. This is useful under
circumstances where identification by control ID alone is insufficient or
error-prone. We recommend that the value you use here is a reference to a member
variable contained within the IdnHolder class that belongs to this dialog. An
instance of this class is already provided by rctocs, for your convenience, and
looks something like this:
/// <summary>
/// IdnHolder object holding all the owner-maintained strings for AlignDialog./// </summary>
public readonly AlignDialogIdnHolder AlignDialogIdns = new AlignDialogIdnHolder();
- Button
- CheckBox
- ColumnHeader
- ComboBox
- ContextMenu
- Control
- HtmlControl
- HtmlLink
- HtmlLinks
- Label
- LabelEditControl
- ListBox
- ListView
- ListViewItem
- MainMenu
- Menu
- MenuItem
- RadioButton
- RichEditBox
- SBTextBox
- SIPFloater
- SIPWindow
- SliderControl
- Softkeys
- TabControl
- TabPage
- TextBox
- ToolBar
- ToolBarButton
- VirtualListView
2013年10月27日 星期日
Something relating to Windows CE/ Mobile
.NET Compact Framework
Microsoft .NET Compact Framework 是 Windows Mobile 和 Windows Embedded CE 裝置上不可或缺的元件,它可讓您建置和執行 Managed 應用程式以及使用 Web 服務。.NET Compact Framework 包含經最佳化的 Common Language Runtime (CLR) 和 .NET Framework 類別庫 (Class Library) 子集,後者支援如 Windows Communication Foundation (WCF) 和 Windows Form 等功能。此外,其中也包含專為 .NET Compact Framework 設計的類別。
.NET Compact Framework 可支援 Visual Basic 和 Visual C# 開發。目前它並不支援 C++ 開發。
.NET Compact Framework 繼承 Common Language Runtime 的完整 .NET Framework 架構,可用於執行 Managed 程式碼,還提供與 Windows CE 作業系統裝置的互通性 (Interoperability),使您可以存取原生 (Native) 的函式,並將您最喜歡的原生元件整合到應用程式中。
下列圖例摘要說明 .NET Compact Framework 平台架構。

.NETCF and Window Phone 7
Windows Phone 7 Series Application development platform is based on Microsoft Silverlight and XNA Framework – that are underneath powered by .NET Compact Framework (.NETCF). .NETCF provides the managed runtime environment for both Silverlight and XNA applications targeting Windows Phone 7.Windows Mobile 5.0 - Emulators: copying files and ActiveSync
Shared Folder
The emulators allow you create a shared folder - a folder on your desktop PC, that appears as a Storage Card on the emulated device. Open up the Emulator's properties from "File / Configure.." and then select a Shared Folder from the textbox.
ActiveSync
Now this is really cool. The new emulators can actually connect to the copy of ActiveSync running on your desktop, and they behave like a real, physical device. This means you can select Explore, and wander through their file system copying and pasting files. This is by far the simplest way to copy your support files to your emulator. You can even copy CAB files, and test your new installers (something I'll cover in another blog entry very soon).
To get ActiveSync working, first configure ActiveSync itself (you'll need the very latest version), by opening "Connection Settings", and changing the pull-down under "Allow connections to one of the following" to "DMA". DMA is "Direct Memory Access", and allows the emulator to create a direct connection with ActiveSync without any extra wires.
Next, from within Visual Studio, open the Tools menu and select "Device Emulator Manger". From within this dialog, find the current emulator you are using, right click, and select "Cradle".
Then on the emulated device itself, open the ActiveSync tool, and select "Connect via DMA..." from the menu option.
Step by Step: Using Microsoft Device Emulator In-Depth in Your Application Development Experienc
Getting Started with Building Windows Mobile Solutions with Visual Studio and Windows Mobile 6 SDK
Windows 7 - Using the Windows Mobile Emulator
Windows Mobile Test Framework Overview
This document will give a high level overview of the pieces that make up the
Windows Mobile Test Framework. This framework is made primarily of .Net class
libraries which are used to automate interaction with the device UI.
These class libraries are broken out into separate layers with differing purposes. The layers are shown in the diagram below, which illustrates how the different pieces are built on top of one another. Tux.Net, not shown here, simply executes code from the test suites, but is built primarily on Logging and Utils.Net components.

The Logging library contains classes associated with logging test data and test result management. The Logging library is generic enough that it can be used by any tool, not just .Net test automation, and it can even be used by desktop tools. The main interfaces into the Logging library for .Net Automation are GlobalLogger and GlobalLogResultManager.
GlobalLogger is used for logging text and comments to log files during testing. It is used by Mtk, UIAL, Area Library, and Test components. It frees you from worrying about where and how to log data - it will make sure your data gets in the right file, where the "right" file is defined by whatever file the GlobalLogger has been configured to deliver to. GlobalLogger also has the notion of logging levels so that you can assign varying importance to different comments. For instance, UIAL comments may be logged at debug level and only turned on during debugging, whereas comments at the test level would always be logged. GlobalLogResultManager is used for keeping track of the result of your test - Pass or Fail - as you perform multiple steps in each test case. It is used almost exclusively in the Test and Area Library layers.
Utils.Net is a toolbox of common device oriented code that can be reused in any automation component including MTK, UIAL, Area Libraries, and Tests. The .Net Framework provides a very rich library of code for desktop tools to reuse, but the .Net Compact Framework contains only a subset of this library. Utils.Net includes many things missing from the .Net Compact Framework that we need on a regular basis to work with and test our devices. As we have need of these missing library components we crate and add them to Utils.Net.
Utils.Net holds code that isn't just useful to .Net Automation, but potentially for anyone who is working with the .Net Compact Framework. In addition, Utils.Net builds for the desktop to facilitate sharing code between device and desktop.
The Device Automation ToolKit (DATK) is primarily a C# library of classes that mirror controls on our devices. Most classes in DATK map to a control found in our devices, such as edit boxes, list views, and buttons. In addition to these control classes there is the WindowFinder class, which is the key to working with DATK. It allows you to specify the characteristics (such as type, text, and owning process) of the control you are looking for on the device, and bind that control to a DATK control object. Using the DATK control object you can get information about the control on the device such as the text, selected/unselected status, focused/unfocused status, and more. Even more importantly you can use the DATK control object to interact with the control on the device. In this way we can use DATK to automate the use of UI on the device.
The DATK does not currently depend on the Logging or Utils.Net components.
The Mobility ToolKit (MTK) is simply an Windows Mobile specific extension to the DATK class library. Because DATK is dedicated to all graphical Windows CE platforms, it has been kept it free of classes representing controls that are not provided as part of the Windows CE operating system. For instance, Softkeys are a very important component in Mobile devices but do not exist in Windows CE itself. We have placed Windows Mobile specific DATK controls into their own library, the MTK. In addition, MTK holds some other classes which are useful to automation. ApplicationManager is the most obvious example of this, which we use to launch applications on Windows Mobile devices.
The MTK has many classes that derive from DATK classes, and it also depends heavily on Logging and Utils.Net.
DATK provides classes for most of the UI elements found on our devices. However, in order to initialize one of these objects to an actual UI element at the Datk layer, you need to use the Datk WindowFinder class. A WndowFinder is provided search criteria such as class name, title, label, control ID, etc and then asked to find the control that matches the criteria it was given. The search criteria are especially sensitive to design and implementation change of the UI, and so this warrants a mode of abstraction to help protect test automation from these changes.
The UI Abstraction Layer, or UIAL, is meant to encapsulate all controls on every form of an application so that the automation developer does not have to determine the properties of every control he uses or use WindowFinder to get that control. It is a C# library that provides a 1:1 mapping between particular controls on the device and DATK control objects. There should be a UIAL for every application, and there should be a property in each UIAL that maps to every control found in that application. This centralizes the work of characterizing each control so that when elements of the UI change only the UIAL needs to change, not all of the code that automates that element.
An application developer must create a UIAL component in order to make their application testable. Anyone can do this for most applications, actually, but only the application developer can reliably ensure that the UIAL adheres to a contract between the automation and the application as the application changes.
The UIAL depends heavily on DATK, MTK, Utils.Net, and Logging. It is used almost exclusively by the Area Libraries. The UIAL is largely tool-generated code, not hand-written code.
The UIAL is used to hide the complexity of finding controls in DATK, but it does not combine the use of these controls into common usage scenarios. This is what the Area Libraries are for - providing a library of routines that act out common UI scenarios on the device.
The goal of the libraries is to make test script writing as straightforward as typing in descriptions of manual test case steps. The code is very generally comparable to the aggregate steps taken in manual testing. For instance, the first step in a test case for Microsoft Word would be open Word.exe, which corresponds to a series of UI based commands: click Start, click Programs File, Scroll Down, Click Word. "Open Word" might be implemented in the Area Library, so that the test case doesn't need to deal with the specifics of what it takes to open Microsoft Word. The Area Library also abstracts away the notions of a Windows Mobile SKU (Professional, Classic, Standard) to provide functions that act appropriately depending on which version is being used.
In our .Net Automation Framework test suites are simply C# classes that inherit from a class called TestSuite. Tests are simply C# methods in these classes decorated with an attribute that designates them as test cases. Tests are generally organized into test suites by feature. Tests rely almost solely on the area library for functionality, and consist of not much more than a series of calls into the area library, to string together common UI scenarios into a single test scenario. Tests do not call into the UIAL unless the test is specific to a particular kind of Windows Mobile device, which should be fairly rare, depending on the application being tested.
A Test developer should create a test assembly to host test cases for their application.
The Tests depend heavily on Area Libraries, for scenario and object creational patterns, and Logging. They occasionally (rarely in theory) need to use UIAL, MTK, or DATK.
Tux.Net is a C# program, specifically a test harness, used to run tests on devices. When run from a device with command line or a configuration file it will locate the specified test suites and tests inside managed assemblies and execute them. It has many options for specifying what tests or suites will be run, and how they should be run (for instance, should they be shuffled or repeated). Tux.Net looks for classes inheriting the TestSuite class and methods with the TestCase attribute to know what it can run, and it can run any assembly meeting these requirements.
Tux.Net executes Tests, but it is built primarily with the Logging library and Utils.Net.
Source: WMTF Document
2013年6月10日 星期一
Android Monkey
Reference:
1.http://developer.android.com/tools/help/monkey.html
2.http://kaijie-chang.blogspot.tw/2011/07/android-monkey.html
3. http://jjnnykimo.pixnet.net/blog/post/35187781-android-monkey-test-%E4%BD%BF%E7%94%A8%E8%AE%8A%E6%95%B8%E4%BB%8B%E7%B4%B9
4. http://android-test-tw.blogspot.tw/2012/10/android-monkey-automation-test.html
2013年6月4日 星期二
Flask & SELinux
Flask was developed to work through some of the inherent problems with a MAC architecture. Traditional MAC is closely integrated with the multi-level security (MLS) model. Access decisions in MLS are based on clearances for subjects and classifications for objects, with the objective of no read-up, no write-down . This provides a very static lattice that allows the system to decide by a subject's security clearance level which objects can be read and written to. The focus of the MLS architecture is entirely on maintaining confidentiality.
The inflexible aspect of this kind of MAC is the focus on confidentiality. The MLS system does not care about integrity of data, least privilege, or separating processes and objects by their duty, and has no mechanisms for controlling these security needs. MLS is a mechanism for maintaining confidentiality of files on the system, by making sure that unauthorized users cannot read from or write to them.
Flask solves the inflexibility of MLS-based MAC by separating the policy enforcement from the policy logic, which is also known as the security server. In traditional Flask, the security server holds the security policy logic, handling the interpretation of security contexts. Security contexts or labels are the set of security attributes associated with a process or an object. Such security labels have the format of <user>:<role>:<type>, for example, system_u:object_r:httpd_exec_t. The SELinux user system_u is a standard identity used for daemons. The role object_r is the role for system objects such as files and devices. The type httpd_exec_t is the type applied to the httpd executable /usr/sbin/httpd.
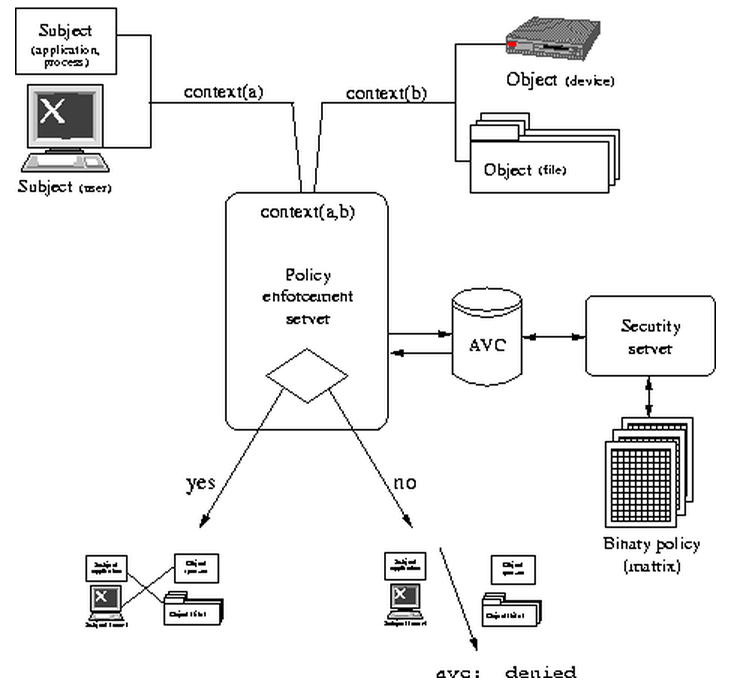
Above picture shows the Flask architecture. In this operation, standard DAC has occurred, which means the subject already has gained access to the object via regular Linux file permissions based on the UID[1]. The operation can be anything: reading from or writing to a file/device, transitioning a process from one type to another type, opening a socket for an operation, delivering a signal call, and so forth.
- A subject, which is a process, attempts to perform an operation on an object, such as a file, device, process, or socket.
- The policy enforcement server gathers the security context from the subject and object, and sends the pair of labels to the security server, which is responsible for policy decision making.
- The policy server first checks the AVC, and returns a decision to the enforcement server.
- If the AVC does not have a policy decision cached, it turns to the security server, which uses the binary policy that is loaded into the kernel during initialization. The AVC caches the decision, and returns the decision to the enforcement server, that is, the kernel.
- If the policy permits the subject to perform the desired operation on the object, the operation is allowed to proceed.
Reference:
2013年6月2日 星期日
Android SELinux: binder & socket
Introduction of binder
Inter Process Communication (IPC) has been a part of Android since 1.0, and yet most of us take it for granted.


Security Mechanism of binder
Malicious applications can make use of binder mechanism to get unauthorized data, SEforAndroid implements security control to check the permissions. The details are as following:
1. Declare a class for kernel policy in external/sepolicy/access_vectors
class binder
{
impersonate
call
set_context_mgr
transfer
receive
}
Impersonate:該 process 是否可以代表另一process使用binder. kernel (selinux/hooks.c) checks permission in selinux_binder_transaction call.
Call:Perform a binder IPC to a given target process (can A call B?).
Set_context_mgr:是否可以将自己註册成Context Manager. Can A set the context manager to B, where normally A == B.See policy module servicemanager.te.
Transfer:是否可以傳遞某類型的binder引用到其他process. Transfer a binder reference to another process (can A transfer a binder reference to B?).
Receive:是否可以接收某類型binder引用.
2. TE中使用 macro 進行配置 binder_use、binder_call、binder_transfer、binder_service
Ex:
# binder_call(clientdomain, serverdomain)
# Allow clientdomain to perform binder IPC to serverdomain.
define(`binder_call', `
# First we receive a Binder ref to the server, then we call it.
allow $1 $2:binder { receive call };
# Receive and use open files from the server.
allow $1 $2:fd use;')
例如servicemanager:
allow servicemanager self:binder set_context_mgr;
allow servicemanager domain:binder { receive transfer };
配置表示了servicemanager可以将自己设置为context manager,并且它可以对所有domain执行receive和transfer的操作。
3. 於 source code中增加相關的操作函數
Ex. kernel/goldfish/security/selinux/hooks.c defines four functions
.binder_set_context_mgr =selinux_binder_set_context_mgr,
.binder_transfer_binder =selinux_binder_transfer_binder,
.binder_transfer_file = selinux_binder_transfer_file,
首先看一下第一个函数,其的实现原理就是去AVC中查询当前的sid是否设置了context_mgr的权限,如果未经授权,则禁止此次操作。
static int selinux_binder_set_context_mgr(struct task_struct *mgr)
{
u32 mysid = current_sid();
u32 mgrsid = task_sid(mgr);
return avc_has_perm(mysid, mgrsid, SECCLASS_BINDER, BINDER__SET_CONTEXT_MGR, NULL);
}
对于transaction的控制也是类似,在binder_transaction中增加hook,用来检查本次调用的权限,其中也是同样在AVC中查询权限。
struct binder_thread *thread,
struct binder_transaction_data *tr, int reply)
……
if (security_binder_transaction(proc->tsk, target_proc->tsk) < 0) {
return_error = BR_FAILED_REPLY;
goto err_invalid_target_handle;
}
……
static int selinux_binder_transaction(struct task_struct *from, struct task_struct *to)
{
u32 mysid = current_sid();
u32 fromsid = task_sid(from);
u32 tosid = task_sid(to);
int rc;
if (mysid != fromsid) {
if (rc)
return rc;
}
return avc_has_perm(fromsid, tosid, SECCLASS_BINDER, BINDER__CALL, NULL);
}
socket
在SEAndroid中service sockets的權限同樣受到管理。Init process 在創建service附属socket的同時,根據 file_contexts 查詢當前socket的權限,並將信息加入到socket的security context中,啟動後的權限如下所示:
srw-rw-rw- root root u:object_r:keystore_socket:s0 keystore
srw-rw---- root system u:object_r:netd_socket:s0 netd
srw-rw-rw- root root u:object_r:property_socket:s0 property_service
srw-rw---- root radio u:object_r:rild_socket:s0 rild
……
关于socket使用权限的配置可以简单的使用两个 macro 定義 unix_socket_connect、unix_socket_send,他们分别对应着 TCP 和 UDP 类型的socket访问。
# socket to serverdomain.
define(`unix_socket_connect', `
allow $1 $2_socket:sock_file write;
allow $1 $3:unix_stream_socket connectto;
')
对于规则的配置只需如下,他表示了adbd domain的subject可以通过vold_socket类型的socket访问vold的domain。
unix_socket_connect(adbd, vold, vold)
reference:
訂閱:
文章 (Atom)